How to upgrade from Windows 11 Home to PRO using Command Prompt (CMD)
1. In this case, start the command prompt with administrator privileges and perform the upgrade.
(1) Click the search box on the taskbar.

(2) Enter the name of the app in the search box and search for it. Enter ( Command Prompt).
(3) Click "Run as administrator" on the right side of the search results.

(4) Once you have opened the command prompt (Run as administrator), enter the command below.
changepk.exe /ProductKey VK7JG-NPHTM-C97JM-9MPGT-3V66T
Type it in and press Enter.
↓Please note that there is a half-width space in the △↓
changepk.exe△/ProductKey△VK7JG-NPHTM-C97JM-9MPGT-3V66T Press Enter⏎ 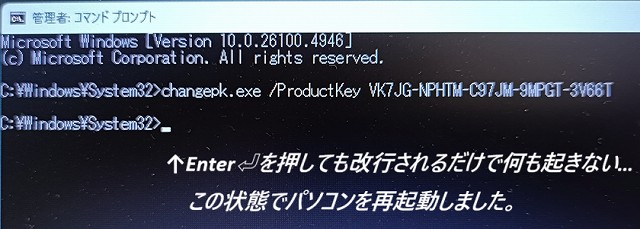
2. Nothing happens in the command prompt except a new line, but just restart your computer.
Then, it will say "Adding features → Update in progress" 

After restarting again, the computer will start up.

Once it is 100% complete, your computer will restart.

...or so I thought, and the Configuring Updates screen appeared.
Once this is 100% complete, your computer will power off and then restart.

The computer will be in the "Adding features" state after starting up.

When Adding features reaches 100%, the device will restart again.
↓Continue by starting up your computer and make sure it is running Windows 11 PRO , then enter your product key to perform the actual authentication.
3. Right-click the Start button, select Settings, and then follow the same steps as above to open the Change Product Key screen.
4. Click the Change button near where your product key is displayed.
5. License activation key (received from your administrator) Enter the
6. It's OK if the license activation status becomes "Active".